netdata 是功能丰富的集群监控工具,具有很多不错的预设告警规则,例如网络丢包、IO 卡顿等。本文将简单介绍「单父节点 & 多子节点」的简洁部署方式,使用 Arch 作为父节点,OpenWrt 作为子节点。
部署父节点
netdata 的父节点在官方文档中被称为 Netdata Parent,可从子节点中接收数据处理。因此父节点最好选用性能不太差的设备搭建。任何 netdata 实例都可作为父节点或子节点,它们只在配置上有差异,子节点可关闭本地分析相关功能交由父节点来承担以节省资源。
安装 netdata
# Arch Package
sudo pacman -S netdata

# systemd
sudo systemctl enable --now netdata.service
配置父节点
从 Arch 仓库安装的 netdata 包默认没有由发行版特意添加的配置,它本身的配置基本开箱即用也不太需要去特意配置。因此只需修改默认 web 绑定地址即可,否则默认会绑定到所有可用地址,有暴露到公网的风险。
# /etc/netdata/netdata.conf
[web]
    bind to = 192.168.2.2 127.0.0.1 localhost
    # default port = 19999
配置父节点的 UUID
# /etc/netdata/stream.conf

# 可使用 `uuid-gen -r` 生成 UUID
[xxxxxxxx-xxxx-xxxx-xxxx-xxxxxxxxxxxx] # UUID
    # Accept metrics streaming from other Agents with the specified API key
enabled = yes可选关闭匿名提交数据
sudo touch /etc/netdata/.opt-out-from-anonymous-statistics重启服务后,可从浏览器访问 localhost:19999/netdata.conf 查看当前配置
sudo systemctl restart netdata.service至此父节点就完成配置了。
部署子节点
自 OpenWrt 17.01 起,官方软件包仓库中包含 netdata,虽然版本较旧但功能也足够使用,并且 OpenWrt 仓库中的 netdata 有针对低内存设备预设配置。
安装
# OpenWrt Package
opkg install netdata

# init.d
/etc/init.d/netdata enable
/etc/init.d/netdata start
配置子节点
从 OpenWrt 安装的 netdata 有一些预设配置,在此基础上关闭些本地分析相关功能减轻内存和计算压力即可。
# /etc/netdata/netdata.conf

[global]
    update every = 2
    memory deduplication (ksm) = no
    debug log = syslog
    error log = syslog
    access log = none
    run as user = root

[db]
    # https://github.com/netdata/netdata/blob/master/src/database/README.md
    # none = no retention, ram = some retention in ram
    mode = none
    # The retention in seconds.
    # This provides some tolerance to the time the child has to find a parent
    # to transfer the data. For IoT, this can be lowered to 120.
    retention = 120
    # The granularity of metrics, in seconds.
    # You may increase this to lower CPU resources.
    update every = 1

[ml]
    # Disable Machine Learning
    enabled = no

[web]
    allow connections from = localhost 10.* 192.168.* 172.16.* 172.17.* 172.18.* 172.19.* 172.20.* 172.21.* 172.22.* 172.23.* 172.24.* 172.25.* 172.26.* 172.27.* 172.28.* 172.29.* 172.30.* 172.31.*
    allow dashboard from = localhost 10.* 192.168.* 172.16.* 172.17.* 172.18.* 172.19.* 172.20.* 172.21.* 172.22.* 172.23.* 172.24.* 172.25.* 172.26.* 172.27.* 172.28.* 172.29.* 172.30.* 172.31.*

[plugins]
    enable running new plugins = no
    cgroups = no
    apps = no
    charts.d = no
    fping = no
    node.d = no
    python.d = no

[health]
    enabled = no

[plugin:proc:ipc]
    shared memory totals = no
连接到父节点
# /etc/netdata/stream.conf

[stream]
    enabled = yes
    # 父节点 <IP>:<端口>
    destination = 192.168.x.x:19999
    # 父节点 UUID
    api key = xxxxxxxx-xxxx-xxxx-xxxx-xxxxxxxxxxxx
在终端重启 netdata
# 禁止匿名提交数据
touch /etc/netdata/.opt-out-from-anonymous-statistics
# 重启
/etc/init.d/netdata restart
访问面板
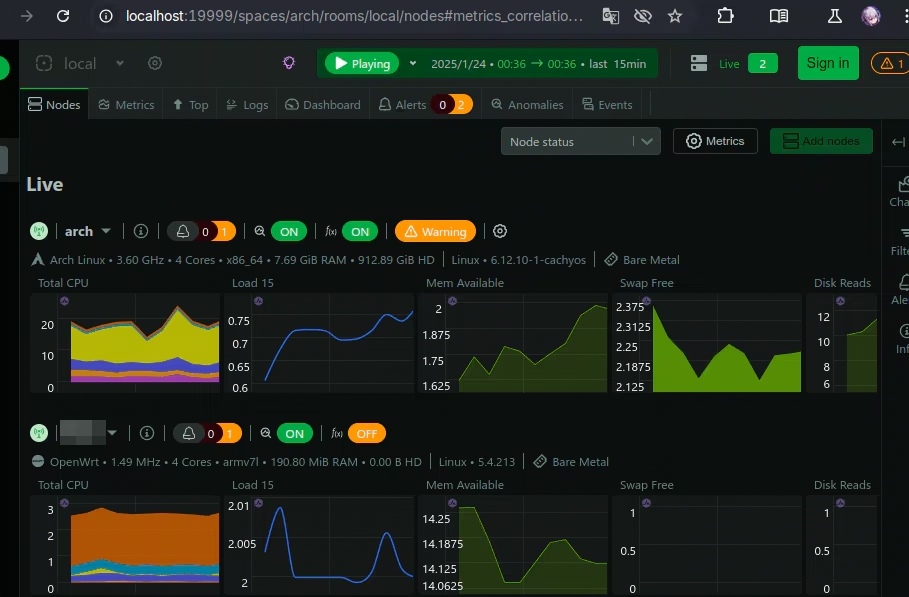
如果一切顺利,在浏览器访问父节点所绑定的 <IP>:<Port> 进入 Web 面板,点击「Skip and use the dashboard anonymously」匿名登陆,或注册账号以体验更多功能,在面板的 Nodes 页面就可以看到 Arch 和 OpwnWrt 设备了。